Monday, April 22, 2019

How to Use the Facebook Pixel Event Setup Tool

Any business serious about conversion tracking and optimization needs the Facebook pixel installed on their website. But getting the pixel and events installed correctly has been a chore, particularly for those who are less technical or lack the staff and resources to handle some basic code.

That changes with the Facebook pixel Event Setup Tool. While you will still need to add the base pixel code to your website, the Event Setup Tool is a codeless, seamless method to integrate pixel events.

It’s really quite easy, no matter your technical expertise. Before we get to the juicy stuff of using this tool, we’ll need to take a couple of steps back.

In this post, you’ll learn:

  • How to install the base pixel code (if you haven’t already)
  • A refresher on pixel events
  • How to use the Event Setup Tool

[Learn more about how to master the Facebook pixel for 2019 in my upcoming training. SIGN UP HERE.]

Install the Pixel First

First, there’s no way around getting the base pixel code installed on your website. If you haven’t done that yet, you’ll need to before dealing with events.

The Facebook pixel is a unique piece of code that connects activity on your website to Facebook. It is the pixel that gives you access to all of the following, and more:

If you haven’t yet installed the pixel, go here. Once you click to set up the pixel, you’ll see three options: 1. Connect a partner platform, 2. Manually install pixel code yourself, and 3. Email instructions to a developer.

Facebook Pixel

If you utilize a Facebook partner (Google Tag Manager, Shopify, Squarespace, WooCommerce, WordPress, and more), Facebook has specific instructions for you to get the pixel installed.

Facebook Pixel

You can otherwise install the code manually or have an email with instructions sent to your developer. If you’re curious, I use Pixel Caffeine (not an affiliate link), a free plugin by AdEspresso.

Here’s a blog post I wrote a couple of years ago that steps through some of the options to get the pixel installed:

6 Ways to Add the Facebook Pixel to Your Website

What Are Pixel Events?

Adding the base pixel code connects your website to Facebook. With your unique pixel on every page of your website, Facebook will be notified when a page of your site is loaded.

If you do nothing else, you’re limited in terms of how much you can get from the pixel. You can create Website Custom Audiences to retarget those who visit your website, which is amazing. But, you’ll need to add pixel events for better tracking and optimization.

A pixel event is a modifier that adds details to the information sent to Facebook. Events allow Facebook to be notified that not only was a page visited, but a purchase (or registration, lead, search, etc.) was completed.

Standard pixel events (expanded since first announced) include:

  • View Content
  • Search
  • Add to Wishlist
  • Add to Cart
  • Initiate Checkout
  • Add Payment Info
  • Purchase
  • Subscribe
  • Start Trial
  • Complete Registration
  • Contact
  • Find Location
  • Schedule

Events become particularly useful for conversion tracking and optimization. They allow you to connect your advertising efforts to a specific number of resulting conversions and, if applicable, the related revenue. Once Facebook collects this info, it also allows the advertiser to better optimize for a particular event.

Earlier, I described some of the tools that become available to you once you install the pixel. But, once you start using events, each of those tools becomes more powerful.

What is the Event Setup Tool?

Prior to the Event Setup Tool, advertisers needed to modify their pixel code on specific pages of their websites to collect anonymous event information. This was done manually, with the assistance of a plugin, or through partner integration.

First announced last June, a streamlined method is rolling out to advertisers (not all have it yet). The Event Setup Tool allows advertisers to add events based on page views or button clicks. Most importantly, no coding is required.

When in your Events Manager, click to Set Up New Events.

Facebook Pixel Events

You will now see the option to use Facebook’s Event Setup Tool.

Facebook Pixel Events

Before we move forward, determine on what page the pixel event will occur, whether by viewing a URL or clicking a button. Enter the URL for that page here…

Facebook Pixel Events

After entering the URL for this page in the step above, click “Open Website.” That will open a new window for that particular page that includes a Facebook dialog at the top left.

Facebook Pixel Events

If any events have already been created for this page, you’ll see them here.

Set Up an Event by URL

One option is to set up a pixel event by URL. In other words, if someone loads a particular URL, this is a sign that a conversion is complete. An example would be a thank-you page following registration for a webinar or purchasing a product. This should be a page that users will only visit once.

Click the “Track a URL” button. You’ll now see this…

Facebook Pixel Events

You’ll want to choose an event that has occurred once a person visits this URL. Facebook provides several standard options…

Facebook Pixel Events

I am going to choose “Complete Registration.”

You also have the option of tracking the entire URL or portion of the URL.

Facebook Pixel Events

“URL Equals” would limit qualified URLs to a single URL whereas “URL Contains” could result in multiple qualified URLs.

Once you’re done, click “Confirm.”

You will now see that event listed.

Set Up an Event by Button Click

This is possibly the most valuable application of the Event Setup Tool. Updating button code to track conversions on click is very technical. I can tell you that I rarely got it to work properly on my website.

Click “Track New Button.”

Suddenly, the page grays out and highlights appear for links and buttons that would qualify.

Facebook Pixel Events

By selecting a link or button here, Facebook will begin reporting on events whenever a visitor clicks it. Once you select your button or link, Facebook will ask you to connect that click to an event.

Facebook Pixel Events

I am going to choose “Lead.” Then click “Confirm.” Once again, you’ll see that event listed under “Events on this Page.”

Facebook Pixel Events

Since I previously created an event based on URL, I have two listed (you may have only one).

Test Your Event

From the image above, note that you can edit or delete an event before finishing. Once you’re finished, click “Finish Setup” at the top right.

Facebook Pixel Events

Facebook now asks to review your events.

Facebook Pixel Events

If it looks good, click “Finish.”

Back on your Events Manager screen in Facebook, you’ll get a notification that your event setup is complete.

Facebook Pixel Events

Click the blue button to test your events. You’ll get a page that looks like this…

Facebook Pixel Events

Note that while in test mode, Facebook will only track the events on that page that you trigger, not the events triggered by other website visitors. Assuming the link to that page you were just working on is in the text box (it should have prefilled), click “Open Website.”

If you created an event by URL, you have already triggered an event. Otherwise, click the link or button on that page that triggers your button event. Then go back to the testing page in Events Manager.

Here is what that page looks like now for me…

Facebook Pixel Events

There are five events listed in all. Two “Page View” events and one “AdvancedEvents” event were created via partner integration (the WordPress plugin I use, in this case). Ignore these since they aren’t related to what we’re discussing today. But the two events I just created (Lead and Complete Registration) are also listed.

In the middle column, you’ll see those two events were created via Event Setup Tool. In the far right column, you’ll see the last time that event was triggered. In other words, these were set up properly!

What About Parameters?

This is all terrific. The Event Setup Tool is a very good option for non-technical advertisers and for anyone wanting a quicker and easier way to set up pixel events.

There is one thing missing, however, that makes pixel events so valuable: Parameters.

Parameters are additional details about the event that occurred. For example, the setup process above can allow you to create a “Purchase” event. This allows you to track purchases when someone views a specific page or clicks a button going forward.

But what exactly did they purchase? What is the value of what was purchased?

When setting up your pixel manually, you can include parameters that provide additional details to reporting.

Facebook Pixel Events

It’s unfortunate that the ability to add parameters isn’t currently included in the Event Setup Tool. However, my educated guess is that this is just an early version. There is really no reason why the tool wouldn’t be able to include anything that you can do manually.

Hopefully, parameters are coming!

Your Turn

Have you tried out the Event Setup Tool? What do you think?

Let me know in the comments below!

The post How to Use the Facebook Pixel Event Setup Tool appeared first on Jon Loomer Digital.

Wednesday, April 17, 2019

How to Duplicate a Saved Audience in Facebook Ads Manager

When it comes to Saved Audiences, a question commonly repeats: How do I duplicate a saved audience in Ads Manager?

While there’s currently no direct way to duplicate a saved audience, there is manual process that allows you to do this. We’ll cover that here.

What Are Saved Audiences?

Facebook’s Saved Audiences feature allows advertisers to create audiences that can be re-used in multiple campaigns. This can be a serious time saver. The feature can also enable more detailed analysis, such as understanding audience overlaps.

To access Saved Audiences, you’ll first need to access Facebook Business Manager, or, if you’re not using Business Manager, go directly to the desired ad account. At the time of this writing, both paths have a standard URL convention, which I’ll share in case it helps.

As an initial step, be sure you are logged into your personal Facebook account. To access Business Manager, you can go to business.facebook.com. To access ad accounts that are not in Business Manager, you can go to www.facebook.com/manage. In either case, you should be sure to select the Ad Account for which you want to create the saved audience.

Once you’re viewing either Business Manager or Ads Manager, click on the drop-down from the top left of the page. Then, select “Audiences” from under the “Assets” section:

Facebook Audience Selector from Ads Manager

Duplicate a Saved Audience

Since there is not an automatic feature to duplicate an audience, here is how we can do it manually, with an easy, straightforward workaround.

First, confirm again that you are in the correct ad account by looking at the ad account name on the top left.

Now, select the saved audience you would like to duplicate by checking the box to the left of that audience’s name. Then, select the “Edit” button:

Ads Manager - Select and Edit Audience
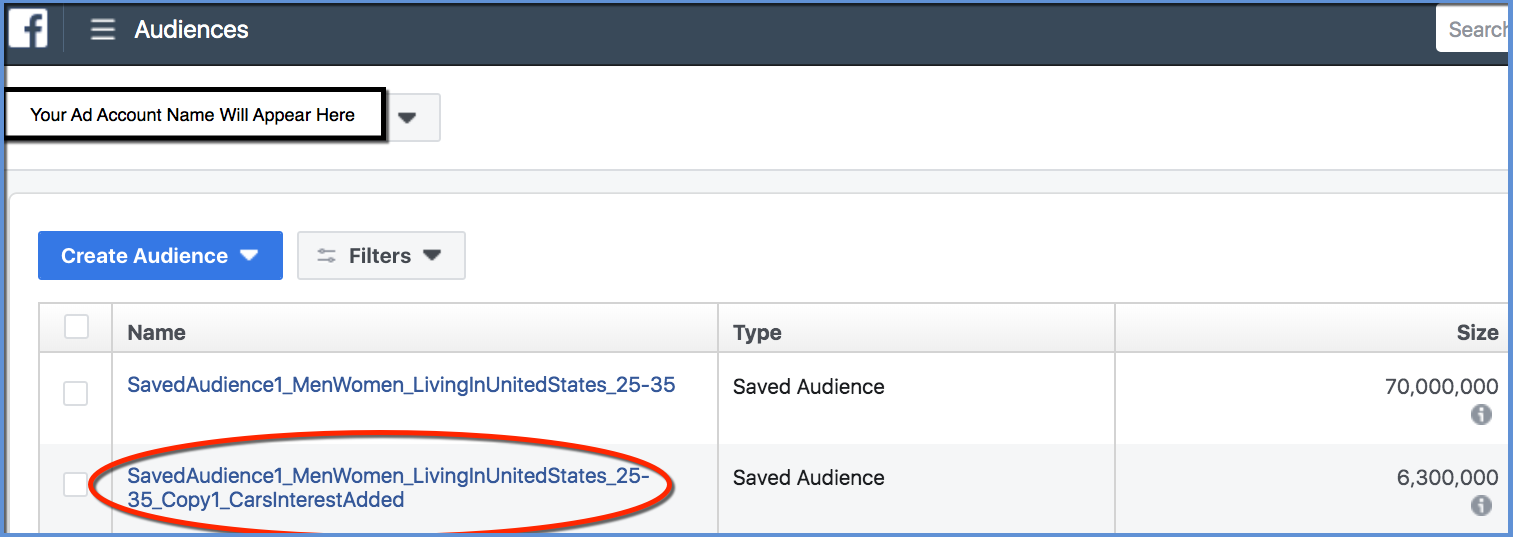
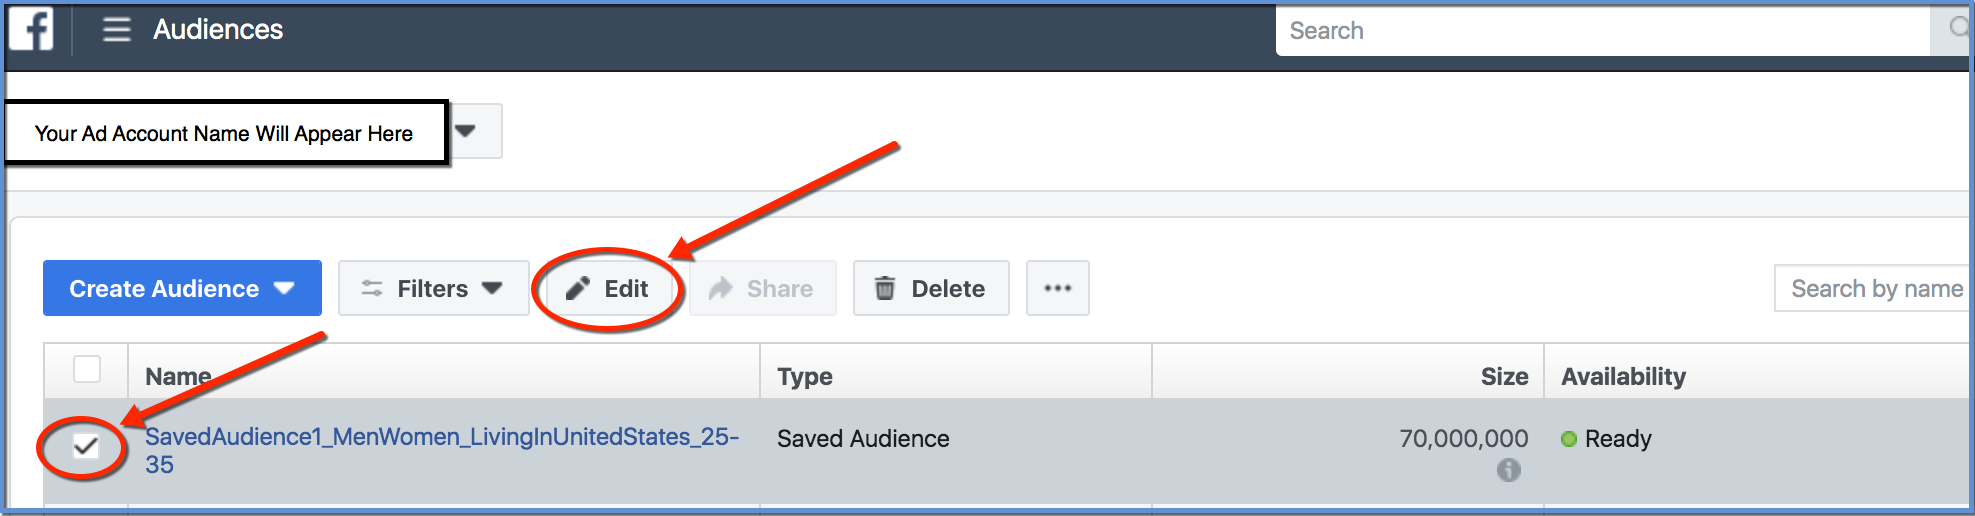
From here, the audience will open. To duplicate that audience, we can simply edit the name (I’ll add a “Copy1” tag to the current name). From here, we can make any changes we’d like to the existing audience.

For this example, I’ll add an interest of “Cars”. Since I want to tell by the name some of the information about the audience, I’ll go ahead and include a reference to Cars in the name as well.

Saved Audience Name Edit

Once you’ve made any changes you’d like, click the “Save as New” button. Be sure *not* to click the “Update” button, as that will simply rename the previous, existing audience vs. duplicating it as a newly-named option.

Save as New Audience to Duplicate - Ads Manager**
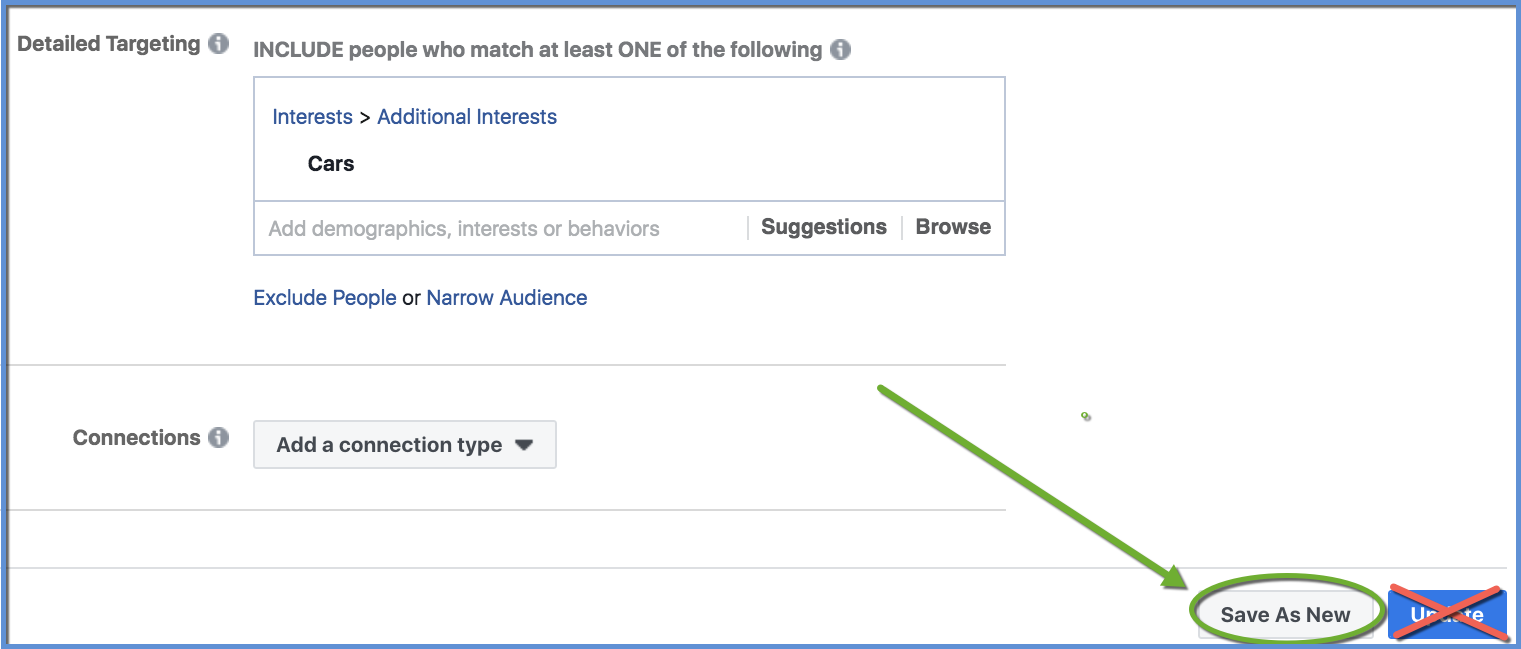
If you accidentally click Update, you can re-open and change back to the original audience name, remove any changes you made (such as the adding of interests), and then click Update again to essentially undo the change you just made.

Once we click “Save As New,” a confirmation screen appears letting us know the audience is about to be copied. Notice here that Facebook automatically adds a ” – copy” tag at the end of the audience name. Since I already added “Copy1” in the name of my newly duplicated audience, I’m going to delete the additional tag before I click “Save”:

Saved Audience Copy Confirmation ScreenOnce the change is saved, you should see the new, duplicated audience appear in the saved audience list:

Saved Audience Name Appears

**If the duplicated audience doesn’t appear, click to reload the page. Doing so normally causes it to populate the newest version.

There you have it! You’ve successfully duplicated one of your existing saved audiences.

This trick works especially well for audiences that have a large number of interests, or when there are other targeting components that you want to avoid rebuilding manually.

Your Turn

I love handy tricks to save time in Ads Manager. How have you used any workarounds?

Let me know in the comments below!

The post How to Duplicate a Saved Audience in Facebook Ads Manager appeared first on Jon Loomer Digital.

Friday, March 29, 2019

5 Enlightened Ways To Use Google Trends for Keyword Research

5 Enlightened Ways To Use Google Trends for Keyword Research was originally published on BruceClay.com, home of expert search engine optimization tips.

Keyword research tools are useful — until they don’t have enough data for your keywords.

You need to select phrases worth targeting. Sure, search engines understand concepts that are semantically connected and don’t just match keywords anymore. But when you write a webpage or design an ad, you still need to know which words to use that will do the best job conveying your concepts to searchers.

Many keyword tools lump variations together, like singulars and plurals. And they may ignore regional differences altogether.

So you may be left in the dark, just guessing.

Enter Google Trends. This surprisingly flexible and free tool can shed light on your keyword research. It gives relative search volume data — helping you choose between close alternatives, discover regional preferences and more.

Here, I’ll show you five ways to use Google Trends to make enlightened SEO keyword choices.

1. Discover Keyword Variations by Region

Your keyword research tool may not show differences in terms across a region or a country. Or it may look like the search volume is too low for you to worry about some keyword candidates. Sometimes that’s true, but sometimes it’s not.

As an example, what should you call something to put on the bed of a truck? If you’re on the East Coast, you’re likely to use the term “truck cap” or “camper shell.”

Looking these terms up in SEMrush provides keyword volume data and difficulty scores for the queries. You can also see a few alternative terms. However, there’s little or no information for these variations in a standard keyword tool.

SEMrush data for truck terms

Data from SEMrush provides a good starting place but may not give the full story. (click to enlarge)

As a result, you might be tempted to just write about truck caps and camper shells, and leave it at that.

Don’t stop there! If you enter all of the keyword suggestions you find into Google Trends, you’ll see a bigger picture.

That’s because people in different regions search for different terms. You can look at the chart by subregion to see this clearly.

Google Trends chart for truck terms

Google Trends can show terminology differences between regions. You can view any country’s data here. (click to enlarge)

So if your website targets the Pacific Northwest, you’ll want to include truck canopy. And in places like Montana and Illinois, you’ll want to talk about truck topper, too. These make sense for those markets.

Which of those two images would you rather use to make a case for your keyword and content recommendations?

You might wonder why the other keyword tools didn’t show any meaningful data for the alternative search terms. It’s likely because their data is based on nationwide searches. But we know it’s important to speak the language of our customers. So use Google Trends to help find keyword ideas for unique content by region.

2. Spot Changing Trends

Language and search behavior change over time. How can you make sure your content reflects these changes?

Case in point: We used to call ourselves an “digital marketing” company. Several years ago, Google Trends confirmed that “digital marketing” was declining as a search term. “Digital marketing” was rising. So we updated our site to reflect how people were searching for our services.

Google Trends graph comparing terms

Trends let you visualize swings in word usage. (click to enlarge)

By the way, “digital marketing” no longer fits our services as it’s become a very broad term. What we really do is provide great consulting services for “search marketing” (SEO, PPC, content, and social), but we do not do email or CRO or reputation management or PR and so on. So our keywords have evolved again.

Sometimes trends swing quickly and permanently.

For instance, Google AdWords rebranded to Google Ads in July 2018. A month later, Google Ads had already overtaken Google AdWords in relative search volume – which the trend chart shows.

trends graph comparing adwords and ads

Language changes can happen quickly. (click to enlarge graph)

Searchers change terms and adapt their searches faster than you (or your boss) might think. So plan to check Google Trends regularly. Watch for competing trends and update your content accordingly.

3. Augment Your Google Analytics

Do you ever notice a big shift in your website analytics data and wonder what’s going on?

There may be times when you don’t have enough historical data to know if your site is seeing an expected change in visits, or if something unusual has happened, maybe in the world at large.

Look in your analytics and Google Search Console data for organic traffic to your landing page for a particular keyword. Also look in Search Console for organic search queries related to your term. Compare this to Google Trends for the same searches, and you can get a more detailed understanding of your site in comparison to larger search trends.

4. Find Spelling Preferences

Keyword search volume tools often lump results together. “Donut” and “doughnut” are listed as having the same search volume in SEMrush. Google Keyword Planner won’t even give volume results for the spelling “doughnut” – even though “doughnut” is the preferred spelling by the Associated Press (which guides most blog and newspaper writers).

SEMrush keyword data for donut

Data from SEMrush (click to enlarge)

But using Google Trends, you can actually compare spellings to see how much search volume each variation gets.

Trends comparing two spellings of donut

Use Google Trends to confirm how to spell keywords. (click to enlarge)

More importantly, notice the annual spike in search trends for all these donut-related terms?

Scroll down to the Related queries section, and you can see searches related to National Donut Day in the U.S. (the first Friday in June). Aha! You have a new content idea for your site’s donut silo.

Related queries in Google Trends

Related queries can give you clues for content needs. (click to enlarge)

5. See What’s Trending Today

Don’t forget daily and realtime search trends. Google Trends lets you change the length of time for your research to just the past day, past 4 hours, or even the past hour!

When there’s an out-of-season spike in visits to your avocado recipes and your PPC budget for those related terms is spent by lunch, the trending searches can point out the avocado recall announcement and give you terms to add as negatives in your campaigns.

Avoid Data Pitfalls Where Google Trends Messes Up

Google Trends can get confused, however.

Searching for “dish soap” and “soap dish” shows identical search interest over time (you can’t even see the blue line below the red in the chart below). Yet they are two very different terms, and their results in a Google search are completely different.

Google Trends glitch seeing two keywords as identical

On some comparisons, Google Trends can’t tell the difference. (click to enlarge)

Search volume from Ahrefs confirms that there is a difference in the terms, as you would expect:

Ahrefs data distinguishing soap dish and dish soap

(click to enlarge)

Another workaround for this Google Trends glitch is to use a plural for one or both search terms, when it makes sense.

You can see that the trends for “dish soaps” and “soap dishes” are distinctly different.

trend comparison graph

Google Trends distinguishes the plural versions. (click to enlarge)

Similarly, “marketing technology” and “technology marketing” also show identical search volumes in Google Trends.

When your common sense tells you that can’t be right, you’ll want to verify with another source. This could be as simple as performing a search in Google. Or you can look at comparison search volumes in another keyword research tool to see if searches really are identical.

Conclusion

Remember, you are not your target market. You might be in your pickup with a truck cap and eating a donut, while your reader is driving around Seattle with a truck canopy and trying to find a doughnut.

Use Google Trends to shed light on your keywords and help you know exactly what you should call things when.

Like this article? Please share it with others who can benefit from these keyword research tips!

Tuesday, March 26, 2019

How I Promoted My SMMW Speaking Session

Last Thursday, I spoke at Social Media Marketing World in San Diego for the sixth straight year. While it’s a big event, there are 10 competing sessions happening at any given time. To help drive people to my session, I ran Facebook ads.

In this post, I’ll outline:

  1. What I Did
  2. How I Did It
  3. The Results I Saw

Let’s dive in!

My Ad

I created a campaign that began the Monday prior to my session, giving me a little more than three days of promotion (I spoke on Thursday morning). I focused my targeting on people in the area (more on that in a minute), and since the event didn’t technically start until Wednesday, I couldn’t really start the campaign any sooner.

Here’s the ad that I created (go ahead and click it to play)…

If you’re familiar with my advertising, this is rather standard for me. Not that I’ve created ads that look just like this, but it’s very simple and doesn’t require a design team. I like to be able to act on inspiration and immediately hit publish.

The goal here was to…

  1. Get the attention of those attending SMMW
  2. Create some mystery around my presentation
  3. Show the value they can expend to get

How I Did It: Objective and Optimization

My goal was to reach the most people attending Social Media Marketing World as possible. To do this, I would want to combine geotargeting (inclusion and exclusion) and interests to focus as much on my potential audience as possible.

Since the audience would be small, I didn’t want Facebook to optimize for an action. As a result, I used the Reach objective

Facebook Ads Reach Objective

…and I optimized for Reach. This means that Facebook will show my ad to as many people within the targeted audience (more on that in a second) as possible.

Since Reach optimization also includes a handy Frequency Capping feature, I capped frequency at three times per day.

Facebook Ads Frequency Capping

Note that I would consider this to be a pretty high frequency normally. But in this case, I’m reaching people for a very limited amount of time and making sure that I get their attention.

I also chose to set a manual bid cap of $200 per 1,000 impressions.

Facebook Ads Bid Cap

Once again, this is not normal, and I would not recommend this under normal conditions. However, I’m willing, in this case, to spend more to make sure I reach my audience.

How I Did It: Targeting

My goal was to reach as many people at the conference, located at the San Diego Convention Center, as possible. Inspired by a blog post written by Trey Edwards, I chose a geographic microtargeting approach.

This involved the following:

  1. 1 mile radius around the primary location
  2. Multiple 1 mile radii exclusion zones

It looks like this…

Facebook Ads Geographic Microtargeting

It may look a bit messy, but the goal was to reach only those in the San Diego Convention Center. By excluding the fringes of the circle, I was able to do that.

I found that the audience was still larger than I wanted. In response, I layered on the Social Media Examiner interest.

Facebook Ads Interest Targeting

This brought me down to a potential audience size of 6,500 people.

How I Did It: Creative and Placements

I had a bit of a dilemma when it came to placements. Typically, you have to be very careful about the placements you use when utilizing frequency capping. You don’t want to waste your one impression per day (if that’s where you cap) on an ineffective placement.

But here, I was using a very aggressive frequency capping number of three times per day. I also wanted to be sure to reach people where they were. So, while I did remove some placements (Marketplace, Audience Network, Messenger Inbox), I kept the rest.

Facebook Ads Placements

Since the video I created wasn’t ideal for all placements, I made use of Facebook’s Custom Creative feature and customized the video by placement.

Facebook Ads Placements Custom Creative

I would create four versions of the video to fit recommendations for each of the placements.

Facebook Ads Placements Custom Creative

The Results

We can throw the results into a couple of buckets:

  1. Facebook Metrics
  2. Real World: Did it move people to attend?

I spent $111.76 to show the ad to 2,559 people a total of 3,821 times (frequency of 1.49) during a short, three-day window.

Impressions broke down by day like this:

  • Monday: 722 (18.9%)
  • Tuesday: 1,151 (30.1%)
  • Wednesday: 1,421 (37.2%)
  • Thursday: 527 (13.8%)

My session was at 10:30am on Thursday.

There were 3,172 video plays, 226 which were at 100%. The ad also received…

  1. Comments from 13 unique people
  2. 66 post reactions
  3. 926 post engagements

At the start of my session, I asked the crowd if they saw my ad. Of the 600 or so in the room, a good number (10-20%?) indicated that they did. That’s not scientific, of course, especially since not everyone will respond.

Overall, I’d consider it a success. For a spend of about $100, I’m confident that this ad helped me accomplish my goal of driving more people to my speaking session.

Your Turn

What do you think about this approach? What have you done in similar situations to promote attendance to an event?

Let me know in the comments below!

The post How I Promoted My SMMW Speaking Session appeared first on Jon Loomer Digital.

Monday, March 25, 2019

Understanding “Recently In” Facebook Ad Location Targeting

Location targeting on Facebook can be a powerful feature. However, there are definitely some challenges with understanding exactly how Facebook uses available information to determine location.

I’ve written in detail about location targeting before. However, as with many topics, there is always room for more exploration. The “Recently In” target feature is one such area that deserves a bit more attention.

The “Recently In” Target Feature

As of this writing, Facebook has four primary location targets available. Facebook’s Help Article defines them as follows:

  • Everyone in this location (default): This option allows you to reach people whose home or most recent location is within the selected area. You might want to advertise large fairs or high-profile sporting events, for example, to everyone in a location.
  • People who live in this location: This includes people whose home is within the selected area. You might want to advertise a local retail store, for example, to people who live in a location.
  • People recently in this location: With this option, you are reaching people whose most recent location is within the selected area. You might want to advertise time-sensitive sales, for example, to people recently in the location you choose.
  • People traveling in this location: This includes people traveling in the selected area as determined by the device and connection information that Facebook collects who are more than 125 miles from their home location. You might want to advertise rental cars, for example, to people traveling in a location.

The option for “People recently in this location” seems fairly straightforward. We target people who had this as their most recent location – ok, got it.

Facebook Ads Recently In Location

However, there are several questions around this. Specifically….

How is Location Determined?

When I wrote the Detailed Guide article on location targeting, Facebook had a dedicated help page that had additional info on location targeting. Unfortunately, it appears the help page has changed its structure, and it no longer has the reference. Thankfully, I had captured that info in the article. Here’s what we had:

  • Everyone in this location: People whose current city on their Facebook profile is that location, as well as anyone determined to be in that location via mobile device.
  • People who live in this location: People whose current city from their Facebook profile is within that location. This is also validated by IP address and their Facebook friends’ stated locations.
  • Recently in this location: People whose most recent location is the selected area, as determined only via mobile device. This includes people who live there or who may be traveling there.
  • People traveling in this location: People whose most recent location is the selected area, as determined via mobile device, and are greater than 100 miles from their stated home location from their Facebook profiles.

Other articles across the web had captured this information as well. I’m not sure why Facebook removed this detail, but we have some other interesting info to look at as well.

Facebook Blueprint’s Training Module on Location: Confusion

The original help page I had pulled the device targeting info from now redirects to a variety of general ad targeting resources. One of these is a Blueprint Training Module on Core Audience Targeting.

To add to confusion, this module has a specific section on Location-Based Audiences. That section seems to almost restructure the definitions of the targeting options:

Facebook Location Options - Blueprint Training Module

Huh? This is very confusing. According to the way this is worded, it seems that we are to interpret the “People recently in this location” to equate to New Residents. That is, the “People recently in this location” is more about people who have recently arrived to a location, which is differentiated from “People who Live in this Location” based on recency alone.

One potential explanation? This is simply a mistake in the training. The main reason I think this: This definition is not reflected anywhere else in Facebook’s documentation on the topic.

As we saw earlier in this article, the main help page dedicated to Location Targeting defines it as “People whose most recent location was in the area.” This does not imply anything about newly arrived residents. This seems like a mistake in Blueprint. If you’re reading this, Facebook, we’d love an updated Blueprint training that has more detail on this topic!

How Might “Recently In” Work in Reality?

I believe we can most easily think through the various targeting options by looking at some scenarios.

Scenario 1: Resident is traveling on vacation.

Let’s say we have someone (I’ll call them Cassandra) who normally resides in New York City, and is currently traveling in Miami.

Which targets would include Cassandra?

  • Everyone in this location: New York City
  • Everyone in this location: Miami
  • People who live in this location: New York City
  • People recently in this location: Miami
  • People traveling in this location: Miami

The somewhat murky area is for “Recently in.” The way I’m interpreting Facebook’s documentation on this, if Facebook can determine that Cassandra’s current location is Miami (based on her mobile device), then she would NOT be targeted with ads associated with “People recently in this location: New York City.”

That said, I can think of one scenario where it could be possible that she would still be included.

As an example, maybe Cassandra last opened the Facebook app on her phone in NYC. She has location services enabled for the app, but only when the app is open. She arrives to Miami, but doesn’t open Facebook on her phone. Instead, she arrives to her hotel, and opens Facebook on her laptop.

In this situation, at least theoretically, ads that are targeting People Recently in New York City could appear on her desktop, as the documentation that we’ve seen in the past indicated that Facebook relies on mobile device location only for the Recently In target. Since Facebook would not have her current location, it would think she was most recently in NYC.

However, in reality, these types of scenarios are likely not the norm. Let’s cover how your campaigns might be impacted by the location target functionalities.

Implications on Ad Campaigns: “Recently In” Target Option

This potentially has significant implications on how people might otherwise think this target functionality works. Based on the way I’ve seen people discuss the Recently In target feature, it seems they are using it almost as a physical retargeting capability.

As an example, you might have someone attend an event in Atlanta, and you want to later retarget everyone who was recently in Atlanta – hoping to capture people who were at the event. Since Facebook would be constantly updating people’s “recently in” location based on whatever the most current mobile device data is, we really would mostly be reaching people who are currently in Atlanta.

This means the “Recently In” location target actually should NOT be used for physical retargeting.

This may beg the question: Why does the “Recently In” target even exist?

To answer this, we can think back to the very first breakdown of definitions at the beginning of this article (in The “Recently In” Target Feature section). As we saw there, the default “Everyone in this Location” target is going to include both people who live in that location AND people whose most recent location was in the area. Since this is including people who live there (but who may be traveling), that could mean we actually have people who are not even in the location seeing the ad.

This thinking aligns with the potential scenario that Facebook mentioned that the “Recently In” target may be applied to. As they state: You might want to advertise time-sensitive sales, for example, to people recently in the location you choose. Knowing that using “Recently In” is the closest alignment we have for people currently in a location, this makes sense.

What To Expect When You Use the “Recently In” Target

To attempt to provide some clarity to a not-totally-clear situation, we can break campaign planning implications into a few different groups when you are using the “Recently In” target:

Situation 1) Ads appearing on the mobile app. In this scenario, you should mostly just expect to reach people who are currently in that location you list. If they are on their mobile app, Facebook will continuously update their location based on the latest data. The latest data should reflect their current location.

Situation 2) Ads appearing on desktop. You should expect to reach people based on where they last were when using their mobile device.

Given the different ways that mobile app usage can impact the way ads are targeted, it may be cleanest to only focus on using mobile app placements for any campaigns that are using the Recently In target. However, you are welcome to experiment and see what you find out!

Where This Leaves UsL “Recently In” Targeting

That was a fun ride down the targeting rabbit hole!

Here’s the short version:

  • “Recently In” can most easily be interpreted as Currently in a location, based on mobile device data.
  • The “Recently In” option should not be considered an effective way to “physically retarget” people based on where they were in the past.
  • Different location targeting options use different data to determine location information.
  • Facebook’s Blueprint module on Location Targeting appears to potentially have a mistake.

Your Turn

A quick shout out to Trey Edwards over at getnerdywithme.com. After we posted the Detailed Guide on Location Targeting, he put together a super-interesting walkthrough on using exclusion targeting to get much narrower than what one might otherwise assume is a radius for a specific location – even down to a single building!

How do you use Location targeting? Do you have any creative methods?

Let me know in the comments below!


The post Understanding “Recently In” Facebook Ad Location Targeting appeared first on Jon Loomer Digital.

Tuesday, March 12, 2019

Advanced Search Operators for Bing and Google (Guide and Cheat Sheet)

Advanced Search Operators for Bing and Google (Guide and Cheat Sheet) was originally published on BruceClay.com, home of expert search engine optimization tips.

When you search, do you find exactly what you’re looking for the first time?

Advanced search operators let you extract everything the engine knows about a specific subject efficiently.

These tricks of the trade can definitely save you time, especially if you’re doing any kind of competitor analysis or SEO research.

Soon you’ll be searching like a pro as you learn:

filter image by StockSnap on Pixabay

What Are Search Engine Operators?

Search operators are a prefix or addition to a query in Google or Bing that limits the results set. They work like customizable filters.

The results page you get back provides entirely different results than the average search.

Example 1
“advanced search tips”

One common operation is to use quotation marks (“) to match an exact phrase. So searching for “advanced search tips” (with the quotes) finds only pages that have those words together as a phrase.

Duplicate content is a problem for SEO. So use exact match searches to find any sites that have copied your content.

Why Should I Use a Search Operator?

Search marketing professionals routinely use search operators to filter results from a search engine.

These advanced search skills let you easily:

  • Locate something specific online
  • Research a site you’re optimizing
  • Investigate the competitive field

When you get comfortable with a few of these commands, you can find what you’re looking for much faster.

How Do I Use Advanced Search Operators?

You enter search operators in the search bar along with your regular query, but with some modifications.

Be sure to type the operator next to your query text with no space.

Example 2
site:bruceclay.com siloing

The site: prefix lets you find content within a certain website. In this example, site: tells the search engine you want to browse a particular domain, bruceclay.com is the domain, and siloing is the topic you are interested in finding.

Your results would look something like the screenshot below. Google found 363 pages about siloing on BruceClay.com:

Example Google site: search results page

The site: command filters your search results to just one website.

It’s often useful to search for a longer phrase within a particular website. You can combine the operators site: and ” “ such as:

Google site search animation

This search found 157 pages. Without the quotation marks, the query would bring back way too many results. The engine would find pages about voice or search — so nearly all the pages on our site!

Bing and Google Search Operator Documentation

Each search engine has its own set of advanced search operators. Here’s the official documentation from the two major search engines for your reference:

List of Advanced Search Operators for SEO (Cheat Sheet)

In the table below, you’ll find the search engine operators that we routinely use in SEO research. (This is not an all-inclusive list.)

Google Bing Result
cache: Shows the version of the webpage from Google’s cache.
contains: Finds webpages that contain links to a particular type of file (such as pdf, mp3). This function is unique to Bing.
ext: ext: Returns only webpages with the file extension you specify (such as htm).
filetype: filetype: Finds results of a single type only (such as pdf).
info: Presents some information that Bing has about a webpage such as related pages from the site, external pages talking about the webpage, and related results.
intext: Shows pages that contain a specific word in their body text.
intitle: intitle: Finds pages that include a specific word as part of the indexed title tag.
allintitle: Finds pages that include all query words as part of the indexed title tag.
inurl: Finds pages that include a specific keyword in their indexed URLs.
allinurl: Finds a specific URL in the search engine’s index. Also can be used to find pages whose URLs contain all the specified words.
related: related: Finds webpages that are similar to the specified webpage.
site: site: Restricts the search to pages within a particular domain and all its subdomains.
* * Acts like a wildcard that can take the place of any word or phrase. Example: tallest * in the world
Excludes results that contain the word following the minus sign. Place this operation at the end of your search query.
” “ ” “ Finds instances of the exact text within the quotation marks everywhere it appears in the search engine’s index.

Search Operators Used in SEO Research

Here I’ll share more ways to use the search commands for SEO research. In the example queries below, the searched phrase is in italics.

Analyze the Competition

Example 3
related:bruceclay.com

The related: operator gives you a glimpse of competitor content.

You’ll see a small selection of what Google considers to be similar. Then you can analyze their SEO metrics — including word count, keyword use, meta data and inbound links — so that you can make your page equal to and then better than its competition.

Example 4
allintitle:seo blog

This query brings up webpages that have both “SEO” and “blog” in their metadata title. We could use this in order to find competing blogs to our own.

The search operators allintitle: and intitle: let you find pages using your keywords in title tags.

Similarly, the commands allinurl: and inurl: let you identify the competition that use keywords in URLs. (Note that as of this writing, the intitle: command works in both Google and Bing searches, but allintitle:, allinurl: and inurl: work only in Google.)

Example 5
cache:https://www.bruceclay.com/seo/

The cache: command shows you a search engine’s cached version of a page. It’s a way to check how the search engine actually sees your page.

Cache shows what page content the search engine considers relevant to retrieve, making this Google search operator a valuable SEO diagnostic tool.

Find Information About a Specific Page or Site

Example 6
info:competitorsite.com

Using the info: command in Bing gives you results that seem like a collection of these advanced search operators. It’s a one-stop shop to access a variety of onsite and offsite results about a website.

Note: Google deprecated the info: operator in 2017.

Discover Indexation Problems

Example 7
site:yourdomain.com

A site: command shows how many pages the search engine has indexed. Though the total number of results is only an approximation, it is a quick way to find out if you have an indexing problem — either too few or too many pages in the index.

Example 8
site:yourdomain.com/blog/*

Specify a particular subfolder of your site to see how many pages it contains. For instance, adding the wildcard * finds all pages under the /blog/.

Help with Site Maintenance

Along with doing SEO research, you can employ advanced search techniques to make site maintenance easier.

Example 9
site:yourdomain.com contains:pdf

The contains: Bing search operator gives you a powerful tool to find links within a site that point to a particular type of file. For example, the query above lets you locate every page on your site that has a link to a PDF file.

Further Refine Results

Example 10
cats -musical

A minus sign (-) before a keyword removes any results with that word. Again, it’s a way to help filter results when a query might otherwise be ambiguous. If you’re looking for info about cats the animal, but there’s a showing of Cats the musical in your town, you can search cats -musical to remove results about the theater production.

Example 11
intitle:keyword -site:yourdomain.com

You can use the minus sign (-) before a search command, too. The above example finds webpages that have your keyword in the title tag, excluding those on your own site. This reduces the clutter when doing competitor research.


Did you like this advanced search operators guide?
We’re full of tips for search marketing. (It’s what we do!) Learn more ways to improve your SEO, PPC and overall ROI by subscribing to our blog.

Sunday, March 10, 2019

Facebook Ads Manager Changes: How to Keep Up

Facebook Ads Manager changes constantly. It is dynamic, with users seeing regular roll-outs of new features. Keeping track of these changes can be a challenge!

We commonly see member posts in the Power Hitters Clubs where users share screenshots of something they see, asking “is this new?” Luckily, Facebook has recently made available some features to help with these types of questions, keeping advertisers aware of changes.

Why Facebook Ads Manager Changes Are Important

Digital advertising is an area of regular changes; some huge and some small. Keeping up can be important, not only to ensure that you take advantage of features available, but also to continuously test advertising processes, techniques, and systems. Constant testing is a hallmark of many successful advertisers.

Facebook (and Instagram) have grown tremendously in a very short period of time. As new resources continue to be added, advertisers must proactively maintain an awareness of what is newly available. In some cases, it’s equally important that advertisers be aware of features that may no longer be available. For example, the removal of Partner Categories, with the subsequent reinstatement of some targeting features, illustrates just how quickly things can change.

Changes to ad tools might be due to regulatory pressure, platform competition (e.g. Google), or simply behind-the-scenes continued innovation. Advertisers are tasked with staying current with what is possible, regardless of Facebook’s rationale.

To avoid overwhelm or distraction, I don’t recommend testing absolutely every new change or feature that Facebook releases. Instead, start with your core business goals, and align the items you test against those needs. I would not advocate simply testing or implementing the “shiny new toy”, merely because it’s available.

What’s New with Ads Manager: Facebook’s Help Center

Within the Help Center, there is a dedicated page that tracks features and changes within the Ads Manager tool. As of this writing, this resource goes all the way back to March 2017. However, this resource has not been updated in 2 months. While it’s unclear whether Facebook plans to continue supporting this on an ongoing basis, it can still be a useful reference point.

Nestled within the November 2018 updates, there is a small note about a new feature within Ads Manager:

Facebook Ads Manager Release Notes

Perhaps somewhat ironic in nature, this call-out mentions a feature in Ads Manager that will communicate new changes and updates directly within the interface. It seems there are two main ways to access this information. I’ll cover both.

Option 1: Accessing Ads Manager Release Notes via Help within Ads Manager

If you log into either Business Manager or Ads Manager, you should be able to click the small question mark icon (?) to the top-right corner of Ads Manager. Note, if you’re using Business Manager, you need to do this from within an ad account. That is, you need to be within the actual “Ads Manager” sub-tool of Business Manager, at the ad account level.

After you select the help icon, the release notes should populate at the top of a box on the right side of the page. There is a “View All Releases” link that opens to a longer view with more release notes available:

Ads Manager Release Notes Ads Manager Help

After selecting the “View all releases” link, there should now be a log of release notes separated by week appearing down the right side of the screen:

Ads Manager Release Notes Log

Option 2: Accessing Ads Manager Release Notes via a Direct Link

I also found a notification within Business Manager that took me to the release notes:

Business Manager Release Notes Notification

After deconstructing the destination of this notification, it seems that users can navigate directly to the screen by following a standard main link. For this to work, you need to already be logged into your Business Manager or Ads Manager account.

Here’s the link: https://business.facebook.com/adsmanager/manage/campaigns?launch_help_tray=RELEASE_NOTES

By using this link, you should be taken to the same release notes log as shown earlier in this article, populated to the right side of Ads Manager.

Final Tips: Navigating Ads Manager Release Notes

If you scroll to the very bottom of the Release Notes section, you should be able to click on the navigation buttons to access older, or newer, release notes:

Navigate to older or newer notifications in Ads Manager Release Notes

Certain items even have additional information available on the specific feature. Normally you can spot these based on a link to  “Learn More” that appears below the specific item:

Learn More Info - Ads Manager Release Notes

Other Resources for Keeping Up to Speed with Facebook Ads Manager Changes

Facebook (and Instagram) have a variety of resources to maintain an awareness of changes, new features, and best practices. While the Ads Manager Release Notes are specific to changes for that tool, there are some helpful resources located elsewhere.

Here are a few I find myself reviewing often:

Facebook IQ: A central hub where Facebook regularly shares research, case studies, and best practice examples of advertiser ads and strategies.

Facebook for Developers Blog: A space where Facebook tends to place more technical updates. Though these are sometimes highly technical in nature, you can occasionally get a sooner-than-others preview of potential new features, prior to their release in general advertising resources. There’s also a Facebook group for Marketing Developers.

Facebook Business is a Page where updates are often shared from the Facebook team. Facebook Business also has an email list that you can sign up for here.

Of course, there’s always Jon’s Newsletter, if you aren’t signed up already!

Perhaps the strongest resource: If you’d like to connect with a community of like-minded advertisers on topics such as these, the Power Hitters Club (PHC) offers go-to expertise. Here, members discuss not only the individual changes, but also the direct implications on advertising activities. Jon also shares weekly updates (via webinar) directly with his PHC members, which is a fantastic way to stay current.

Your Turn

How do you remain up-to-date with changes in Facebook advertising?

Let me know in the comments below!

The post Facebook Ads Manager Changes: How to Keep Up appeared first on Jon Loomer Digital.