How to Improve Google Image Search Ranking was originally published on BruceClay.com, home of expert search engine optimization tips.
If you can optimize it, you should. And images are no exception.
The images on your website represent another way to drive organic search traffic. Often overlooked, Google Image SEO can be just as important as optimizing your webpage text.
In fact, you might be surprised at just how much traffic your images are already sending to your site.
TL;DR: Google Images represents another path outside of regular web search for your audience to find your site and discover your content. Google is making significant changes to Google Images that put more emphasis on quality and relevance. To help you drive traffic from image search, we provide a list of ways to optimize images for a website.
How to SEO Images: Table of Contents
First, we’ll take a quick look at the latest news about Google Images:
- Updates to Google Images Search
- Google Hints at More Changes to Come
- AI-Powered Results in Google Images
Then we’ll dive into how to SEO images in 16 steps:
- Track Your Image-based Traffic
- Create High-Quality, Original Content
- Use Relevant Images
- Have a Proper File Format
- Optimize Your Images
- Always Create Alt Text
- Make Use of the Image Title
- Create an Image Caption
- Use a Descriptive File Name
- Implement Structured Data if Possible
- Consider Image Placement on the Page
- Analyze the Content Around the Image
- Create Page Metadata
- Ensure Fast Load Time
- Make Sure Images Are Accessible
- Create an Image Sitemap
What’s New with Google Images
Google’s goal over the past year was to make image search more useful to users. We’ve likely all had the experience of finding an image connected to a not-so-great webpage.
Now, images attached to great content can do better in Google Images. So websites have more opportunity to rank images and drive traffic with well-optimized content.
Updates to Google Image Search
Major improvements to Google Images were announced in September 2018. The image-ranking algorithm now weighs these factors more heavily:
- Authority: The authority of the webpage itself is now a more important signal for ranking an image.
- Context: The ranking algorithm takes into account the context of the search. Google used the example of an image search for “DIY shelving.” Results should return images within sites related to DIY projects … so the searcher can find other helpful information beyond just a picture.
- Freshness: Google prioritizes fresher content. So ranking images will likely come from a site (a site in general, but we believe the actual webpage in question) that’s been updated recently. This is probably a minor signal.
- Position on page: Top-ranked images will likely be central to the webpage they’re part of. (And higher up in placement on the page.) For example, a product page for a particular shoe should rank above a category page for shoes.
Google Images results pages also got a facelift:
- Captions: Image results now show more context. For example, searchers can read captions including the website and title of the page where the picture is published.
- Related searches: Google started providing related search terms at the top of the results page. Notice the buttons, which help users narrow their search.
NOTE: We cannot reproduce this in Google SERPs today, so this may have been a temporary feature.
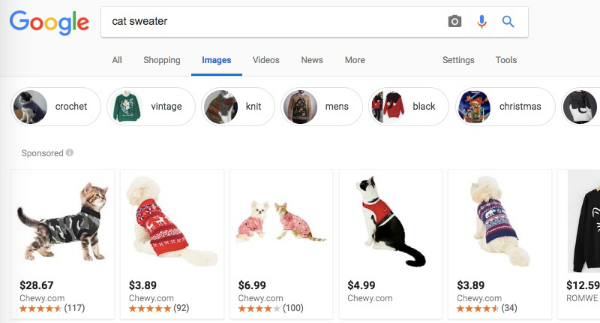
Related search terms across the top let searchers narrow image results.
Google Hints at More Changes to Come
Google Webmaster Trends Analyst John Mueller indicated this week that images are a “bigger topic” now.
People are running transactional and informational types of searches more frequently through Google Image search. We don’t have details yet, but Mueller’s statements (see below) make it a good bet that more UI changes are coming.
There’s nothing specific to announce from my side — it’s just a general observation that images are (once again) gaining importance overall on the web, and a reminder to think of them as a way of enabling users to find your content through Google Images / image search.
—
John
AI-Powered Results in Google Images
One futuristic feature that Google has already rolled out is its AI-powered Google Lens technology.
Users can now identify objects of interest within images as they look through image search results:
Lens’ AI technology analyzes images and detects objects of interest within them. If you select one of these objects, Lens will show you relevant images, many of which link to product pages so you can continue your search or buy the item you’re interested in. Using your finger on a mobile device screen, Lens will also let you “draw” on any part of an image, even if it’s not preselected by Lens, to trigger related results and dive even deeper on what’s in your image.
To show this in action, I searched for [diy outdoor grilling stations] and picked out a beverage center sitting in one of the resulting pictures. This revealed a new set of image results:
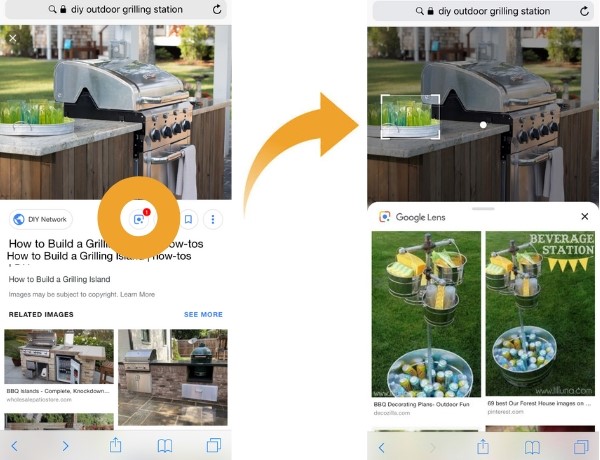
Google Lens at work: searching within a picture.
For now, the Lens feature works only in U.S. English, and only from image search in mobile browsers, not in the Google app.
But we expect Google Lens to be activated across more search platforms soon. It makes image search extremely flexible, letting users pinpoint what they want using visuals instead of words.
This new AI technology increases the population of search results. It also encourages more image-based searches.
Google increasingly understands the contents of even non-optimized images. So your images potentially have much more competition.
Image SEO becomes even more important. It’s time to optimize your images so that they can stand out.
How to Optimize Images for SEO
With all these changes to Google Images, how do you ensure you can get your share of visibility?
In this sense, Google Images search works much like regular web search. Googlebot needs to be able to crawl, index and understand what your images are about. Only then can they rank.
The latest updates to Google Images tell us that relevance and quality are more important than ever. That means providing the search engine with as much context as possible.
Here are 16 important steps to SEO images …
1. Track Your Image-based Traffic
Want to know how many visitors you get through Google Images search?
You can track organic search traffic from Google Images using the Search Console Performance report.
How to track image search traffic:
- Log in to Google Search Console for your website.
- Click Performance.
- Change the search type at the top to Image. This filters the data so you can keep an eye on your traffic from image search.

Alternatively, in Google Analytics you can use the Referral report. Google Images search traffic is broken out from other search traffic. The line with the Source/Medium “google organic / images” is where you’ll find that data.
Take a baseline and watch your search traffic grow as you apply SEO to your images.
2. Create High-Quality, Original Content
Search engines want to reward high-quality pages. This applies to the information on the webpage that your image is hosted on, and to the image itself.
In its image best practices help file, Google discourages “pages where neither the images or the text are original content.”
So whenever possible, take your own photos and make your own graphics.
What if you have to use stock photos? There are a lot of ways to modify stock images to make them unique. You can add filters, crop them, overlay text, and much more.
Also remember that when you do use images from elsewhere, you must honor copyrights, license fees and/or trademark laws.
Google now includes metadata support for crediting images to the proper author and rights holder. This is visible by clicking “Image credits” where available.
3. Use Relevant Images
Choose or create images that are helpful to the overall theme of the page. That might be an infographic, a diagram, an appropriate photograph or something else.
Remember that search engines would rather rank a picture if it’s on a webpage that will satisfy the searcher’s intent with more relevant content.
4. Have a Proper File Format
Use an image file format that search engines can index. The three most common are:
- PNG, good for screenshots and images with graphics or text. Depending on image complexity, PNGs may create larger files than the other formats. The PNG format uses lossless compression, which means the quality is preserved.
- JPEG, good for most photographs. JPEGs create smaller files by using lossy compression, which means there will be a loss of image quality every time you save this file format.
- GIF to create animations. GIFs use lossless compression, which means the quality remains the same.
Another type that’s becoming popular is:
- SVG. This is a scalable vector format. As opposed to the raster types mentioned above, vector graphics can be extremely small files that don’t lose quality no matter how much they’re enlarged.
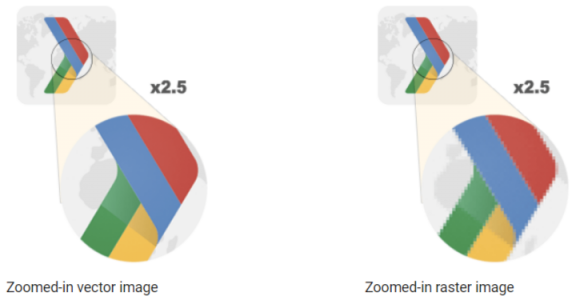
Notice how the vector does not pixelate as it’s enlarged. (Image credit: Google)
SVG isn’t right for photos or complex images, but it works well for simple graphics with geometric shapes, such as a logo.
Now, next-generation image formats exist. These formats have better compression, are higher quality, load faster, and take less cellular data:
- JPEG 2000
- JPEG-XR
- WebP
WebP has been gaining attention lately. It’s possible to convert existing JPEG and PNG files to WebP.
From the Google Developers FAQ page on WebP:
WebP is a method of lossy and lossless compression that can be used on a large variety of photographic, translucent and graphical images found on the web. The degree of lossy compression is adjustable so a user can choose the trade-off between file size and image quality. WebP typically achieves an average of 30% more compression than JPEG and JPEG 2000, without loss of image quality …
5. Optimize Your Images
There’s no single best way to optimize images. For each one, you need to find the optimal balance between minimum file size and maximum quality. Here are must-dos:
- Resize and crop images to be no larger (in dimensions) than they’ll be displayed. With raster-style images (the most common type on the web), you might need to save several versions at various resolutions to work for different users.
- Choose the most efficient file format per image (see my last point). It’s OK to mix different types of images on the same webpage.
- Use compression to reduce file size. When saving a JPEG, for example, slide the quality bar down as far as you can without losing visual quality. With an SVG file, Google suggests you minify it by running it through a tool like svgo.
- Consider replacing a picture with a different technology altogether. CSS effects can produce shadows, gradients, and more. Web fonts let you show text in beautiful typefaces, which actually improves your page’s usability and crawlability compared to an image.
I suggest you bookmark Google’s image optimization guide for more technical how-tos.
6. Always Create Alt Text
Accessibility for all users is important. That’s why adding alt attributes to images is part of our always up-to-date SEO checklist.
Alt text describes what the image is about to the visually impaired who use screen readers. It also can give search engines valuable information about the image’s contents.
Only when appropriate, use a relevant keyword you’re targeting to describe the image.
Remember that with linked images, search engines treat the alt attribute as the link anchor text. For example, if you have a question mark icon linking users to your help system, include alt=”Help” in your image tag.
7. Make Use of the Image Title
There’s an optional title attribute that you can give to each image. Some tests have shown that Google does index image titles.
8. Create an Image Caption
Add a little extra context by describing the image in a caption. You can also give the image source here, if appropriate.
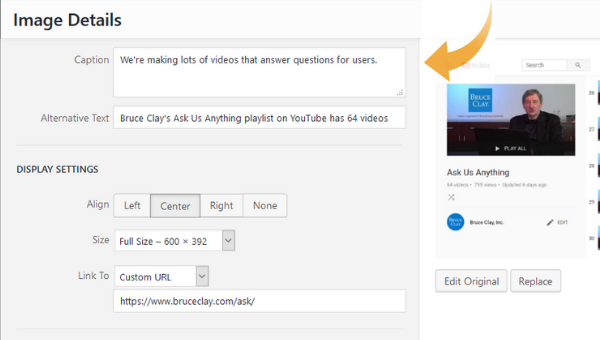
In the WordPress editor, adding a caption is simple to do.
9. Use a Descriptive File Name
This is an often-overlooked step. But I have a quick remedy.
When you save your image file, accurately describe the photo in a few words or less. For example, ugly-christmas-sweater is a better file name than IMG01534.
In a webinar with Google’s Gary Illyes at Search Engine Journal, he pointed out that it’s just not feasible for large sites to have accurate file names for all their images (Pinterest, for example).
Illyes says this is more of a nice to have than a requirement for ranking. But, Illyes did explain when the file name can matter:
“I would imagine that it would be something that, all signals considered equal in case of your and your competitor’s images, if you have a better file name, then perhaps you might get ranked better with your image …”
10. Implement Structured Data If Possible
Google Images supports structured data markup for a product, video and recipe.
When you add structured data to your webpage’s HTML, your image results can be richer. Extra bits of information can show along with the image. And that can encourage more clicks and visitors to your site.
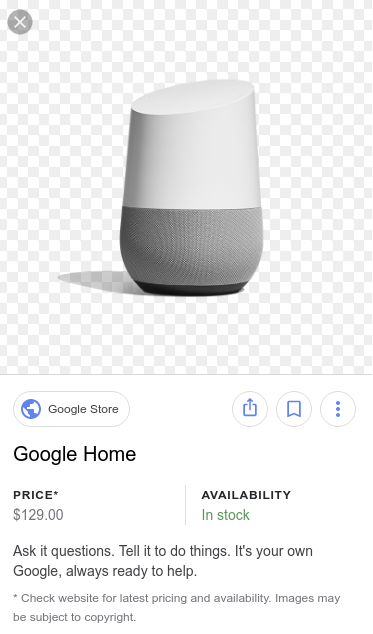
Structured data can help Google display things like the price and availability of a product.
11. Consider Image Placement on the Page
Google says in its image best practices page (linked to earlier) that “when it makes sense, consider placing the most important image near the top of the page.”
But in the SEJ webinar, Illyes said that you can put an image “pretty much anywhere on the page” and it can be picked up and shown in Google Images if it’s relevant to the query.
12. Analyze the Content around the Image
Consider the body text around the image. Does it give context to what the reader is looking at?
In the SEJ webinar, Illyes called the content around the image (on the page or in a caption) “critical” to understanding the image.
A$: The big one for me is to get the accessibility right with the alt text, then build around that with good captions and other related text near the image, Then add in a good file name and the image title. #SEOChat
— Paul Thompson (@thompsonpaul) October 11, 2018
13. Optimize Page Metadata
Google shows relevant information about the webpage (where the image appears) in Google Images results.
So don’t skip your metadata, including title and meta description. They give the user and search engine more context — just like in the regular search results.

Metadata (page title and description) can now show up in image search results.
There’s no guarantee that Google will use your metadata word for word. But they’re definitely part of its information processing. Google’s image best practices says:
Google Images automatically generates a title and snippet to best explain each result and how it relates to the user query. … We use a number of different sources for this information, including descriptive information in the title, and meta tags for each page.
14. Ensure Fast Load Time
Performance is a huge consideration for SEO in general.
Large images can drag down page load time. Here are tips to avoid that:
- Keep image files as small as possible (see Optimize Your Images above).
- Make images responsive. Basically, that means they automatically change size to fit the user’s device. You can read more about responsive images here and in the “responsive images” section of the image best practices page.
- Specify how much space the image is going to take up. Knowing this enables a browser to load the surrounding page content while the image file is being requested. There are a number of ways to do this, including: with a
<div> container; in the CSS code; or with height and width attributes in the <img> tag. - Consider lazy loading, which Google recommends as a way to combat slowness.
15. Make Sure Images Are Discoverable
Make sure that search engines can access the images on your site. When they can’t, the robots.txt file is often to blame.
Google Search Console’s “Inspect URL” feature can help you test this. You can also use Google’s mobile-friendly test tool to discover how your pages, including images, work for mobile.
Also, images have their own URLs that can be indexed. So to preserve existing image rankings, be sure to use a proper 301 redirect if you ever need to change an image URL.
16. Create an Image Sitemap
As an optional step, you can create an image sitemap that lists the image files on your website. This can help Google discover them.
You can create a separate XML sitemap for images. (Learn more about that in our creating a sitemap tutorial.)
In the webinar at SEJ, Gary Illyes said that image sitemaps “help enormously” with the image discovery process.
I recommend including only original images, and not all site images, in your sitemap. Listing images from any external source may be a waste of the search engine’s processing budget. Google will find them on your pages anyhow. Taking crawl time, as if they have changed, is not needed.
If an image is unique to your site and revised or new, then include it in your image sitemap. If it was already crawled and not altered, a recrawl is simply wasting time.
Summary
The changes to Google Images are positive for users and for SEOs. Google has once again elevated the standards for websites to create quality content.
Image SEO will evolve — but many of the basics still hold true. The goal is to create the best experience for users visiting your site.
- Present original, useful content with high-quality, relevant images.
- Make a fast website that doesn’t make users wait for pages to load.
- Optimize your images so that search engines can index them properly.
Apply the techniques in this article to optimize images. You may get a leg up on the competition and more eyeballs on your webpages.
(Learn more about how to optimize multimedia content. And check out our search engine optimization tutorial for more best practices.)
I want to know: Have you had good results ranking in the new Google Images? What techniques have you implemented? Let us know in the comments below.
No comments:
Post a Comment